
First step. Learn the finger numbers, fret numbers, and string numbers. At this point in class we will practice muted strumming to get a good sense of tempo, pulse, meter, rhythms, accents, downbeats and syncopations. This translates to time signatures, whole notes, half notes, quarter notes, eighth notes, sixteenth notes and rests. Those new to standard notation will play "by ear" at this point.
|
Hope you enjoy using this page as you progress in your study of the guitar. “If you play music for no other reason than actually just because you love it, the skills just kinda creep up on you.” ~ Nuno Bettencourt.
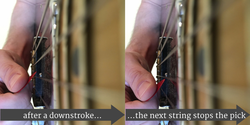
When the pick slides from one string to land on the next adjacent string the stroke is called a rest-stroke. Playing each string by guiding the pick toward the guitar can produce a full warm tone. Strumming in such a manner may be described as successive rest-strokes one after the other in one continuous un-interrupted steady motion. You can practice this as a down or an up stroke, just be sure to change the pick angle to reduce resistance.
|
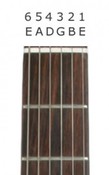
Next step learn your pitch letters for the open strings. Regardless of your prior experience, this will take some practice and repetition to become "second nature". There should be no lapses of memory when identifying the strings by letter name. At this point in class we will learn to use electronic tuners to adjust string tension to the corresponding pitches for standard tuning.
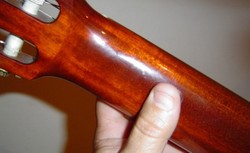
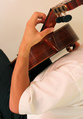
As we begin left hand technique one of the most significant predictor of success will be thumb placement and form. Remember to aim for the center of the guitar neck using a "flat" thumb. Resist the temptation to "squeeze". The thumb serves as a guide to insure proper form of the fingers.
|
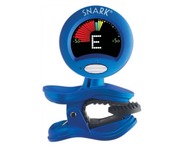
Tips for tuning.
1. Play the string you wish to tune before turning the tuning machine. 2. Think about the note you are aiming for. 3. Continue playing the string as you adjust from below the desired pitch and gradually, slowly tighten the string until it registers green in the center (the desired pitch) with no yellow (indicates that it is sharp) or blinking or disappearing green (indicates flat). Once green registers solid and does not waiver, give the string a gentle tug and test it again. If it still shows the correct pitch letter and holds firm in the center "green". You are in tune. If the tuner seems to be confused about the pitch. You may try playing the 12th or 5th fret harmonic to tune, or try moving the tuner slightly to register vibrations on a different part of the head-stock. Also make sure the tuning machine you are turning is the one that corresponds to the string you are plucking/tuning. |
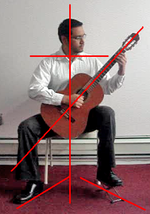
1. Sit on the edge of your chair.
2. Left foot flat on a foot stool, right foot flat on the floor, create space for the guitar.
3. Head-stock is eye level.
4. Body aligned and sitting tall.
5. Left hand thumb flat against the center of the guitar neck and perpendicular as in the pic above. Left hand fingers curved as if holding a ball, fingertips contacting or hovering above strings.
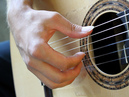
6. Right forearm resting on the lower bout, right wrist comfortable curved with wrist, forearm, and hand in alignment. If using a pick the pointed edge of the pick points toward the guitar and the thumb grips the pick by pressing it between the edge of the curved index finger.
2. Left foot flat on a foot stool, right foot flat on the floor, create space for the guitar.
3. Head-stock is eye level.
4. Body aligned and sitting tall.
5. Left hand thumb flat against the center of the guitar neck and perpendicular as in the pic above. Left hand fingers curved as if holding a ball, fingertips contacting or hovering above strings.
6. Right forearm resting on the lower bout, right wrist comfortable curved with wrist, forearm, and hand in alignment. If using a pick the pointed edge of the pick points toward the guitar and the thumb grips the pick by pressing it between the edge of the curved index finger.
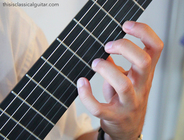
Once we have established proper seating, and guitar position we are ready to begin developing a very dependable consistent left hand technique. By keeping our fingers round, we create space between the hand and the guitar neck. This will allow our chords to ring clear later and will give us leverage for effective fretting. By simply using a relaxed natural curved shape to our hand we benefit from the equal alignment of the fingertips to the guitar string. The curved hand produces angles at the pointer and pinky. These details make fretting near effortless as the laws of physics work for you by concentrating force into a very small area creating more than enough pressure with relatively little muscular effort. Gravity, arm weight, leverage, small target area all mean plenty of pressure. The equation formula for Pressure is Force ÷ Area or P = F/A. Use the properties of physics to get the job done.

|

|

|
|
|
" Easter Bunnies Go Dancing At Easter. "
Learn the notes from high to low. Master the recognition of these pitches on treble clef. These are the notes we tune to. Think of at least 3 different ways to test yourself for complete mastery. There should be no hesitation recall must be instantaneous.
Learn the notes from high to low. Master the recognition of these pitches on treble clef. These are the notes we tune to. Think of at least 3 different ways to test yourself for complete mastery. There should be no hesitation recall must be instantaneous.
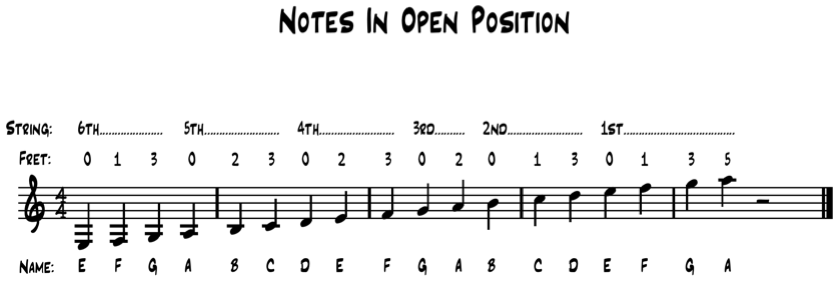
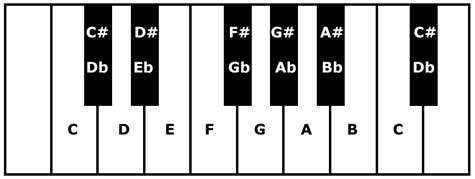
Learning the notes on guitar is really no different than piano. Look for the relationship of the notes to each other. We call the white key pitches the Natural Notes. The black key pitches are described in relation to the neighboring natural note by using the symbol for sharp or flat # or b . The scale above are the Natural Notes on guitar. Just like piano and other instruments there is a half step relationship between E and F and between B and C. The remaining natural notes are a whole step apart or have a fret between. But unlike piano guitar music is written only on treble clef not grand staff.
When practicing your open position Natural Notes use the left hand fingers that correspond to the frets so your hand maintains a comfortable stable stationary position. First finger = first fret and so on.
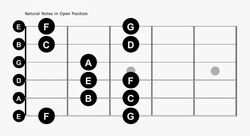
This graph shows the scale finger pattern using circles. Graphs will be used to learn chords. Make sure your comfortable with this graphic system but be careful not to use it exclusively to avoid learning standard notation. The graph helps clarify the half step relationships between E and F and B and C. Tip for working ahead, Think of of how you might draw an F# on the graph, or where to find it on the keyboard, and or music staff? If you can do all 3 you are on the right track. Go You!
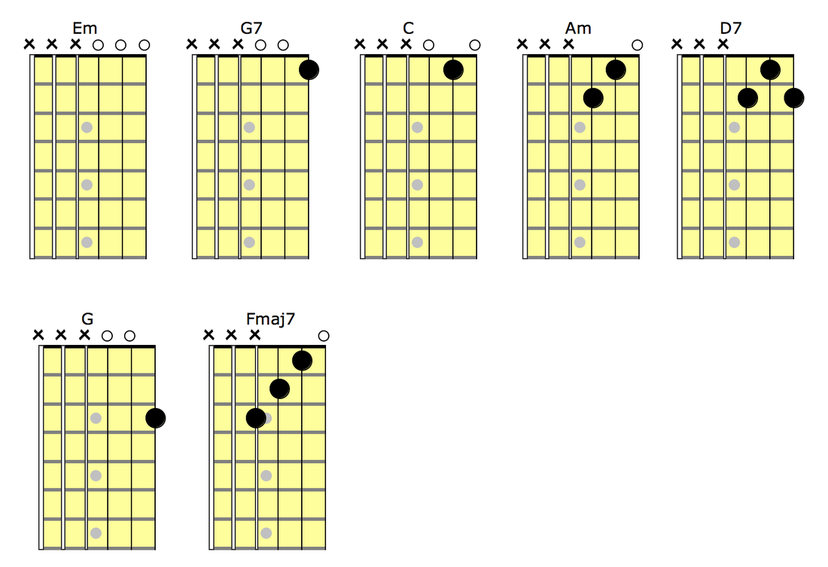
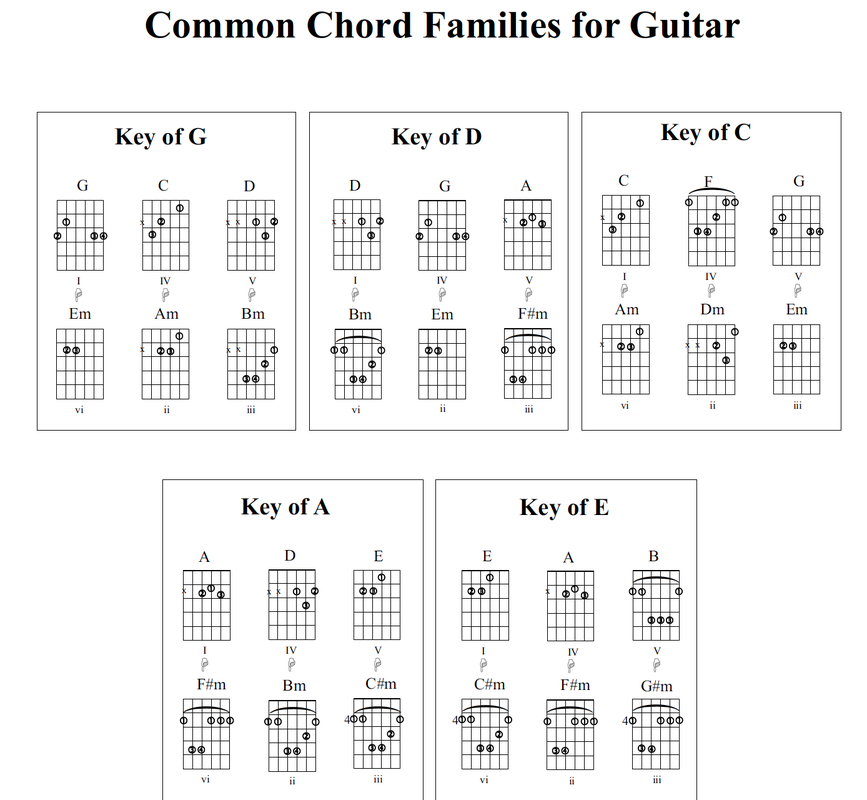
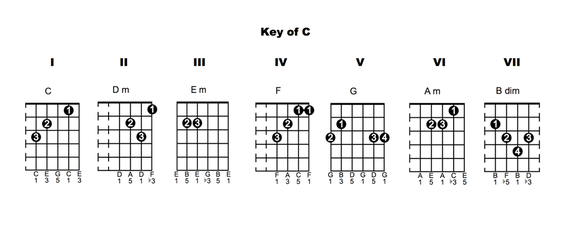
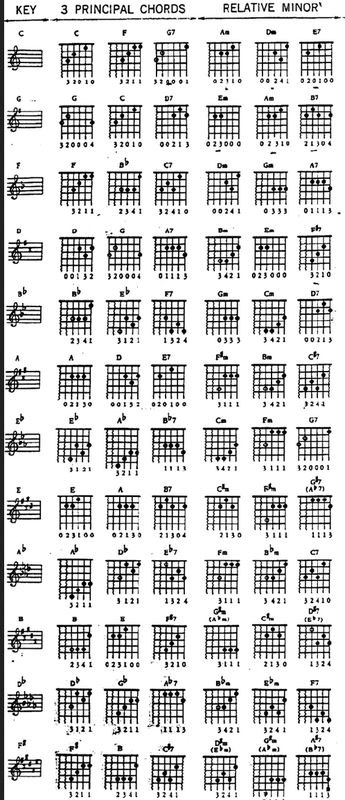
The chord grids above are a great way for a beginner to play chord progressions. Try the following progressions Em Em Am Em, "Ghost of John" G Am D7 G, "Music Alone Shall Live" C Em Am F "Count On Me" C Am F G7 or G Em C D7, " 50s Progression" C F G7 or G C D7. Try writing each chord voicing from the above grids on the music staff.
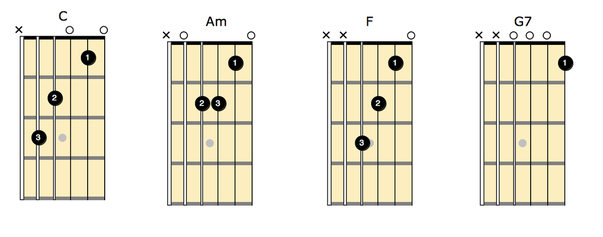
When your ready try these chords. Start with just the C to Am only moving finger 3 as you change chords. Common fingers and common notes are a great way to facilitate smooth chord changes. Keep the first finger from moving as you add the F chord. The first finger is your anchor. Then with a slight "hop" barely lift up as you change for the G7. Economy of motion is the key.
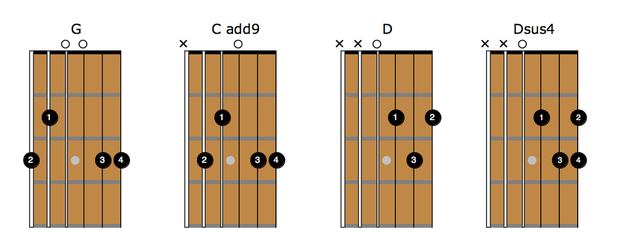
This example uses finger 3 and 4 as the anchor. This progression will get easier in time if the finger 3 never moves as you make the changes. Finger 4 should only lift when necessary to produce the D major chord voicing. Try songs like "I'm A Believer", and "Sweet Home Alabama" for fun.
|
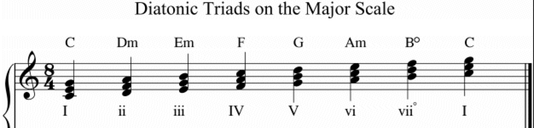
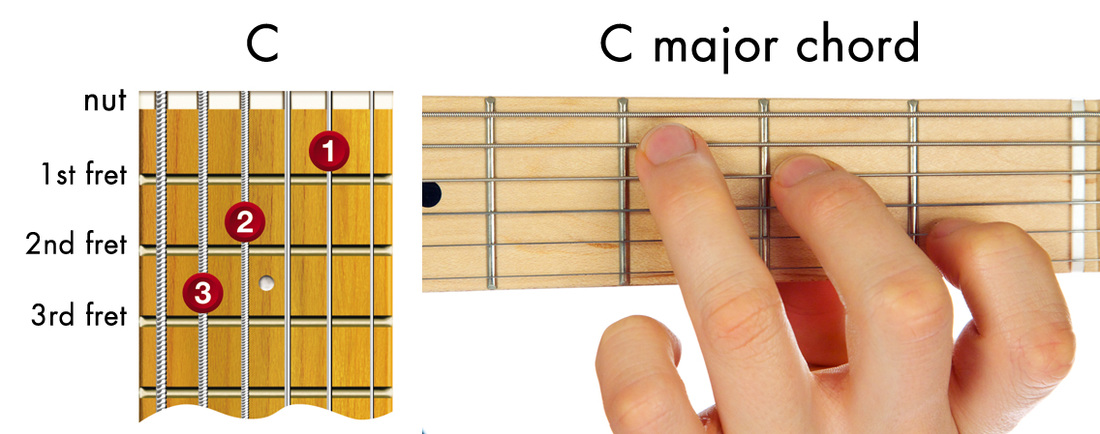
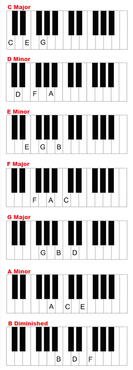
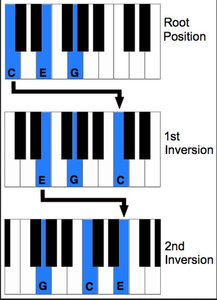
These chords (above) are basic root position triads in C. Try playing them on piano as illustrated (left) to become familiar with their sound. The spelling of each chord follows a pattern or formula of third intervals. To find "third" relationships try spelling scales "every other note".
|
The guitar version of such chords are still considered root position because the lowest note is the note is the "Root" of each chord.
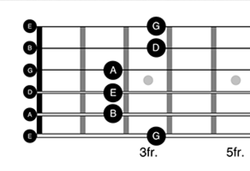
Here is a scale pattern to play for fun. It will work for many kinds of songs. It is called a pentatonic scale. It can be used for major and minor keys. This example is an E minor pentatonic. It can also be a G major pentatonic scale depending on the musical context. More on this later. This scale is great for improvisation. By leaving out the 4th and the 7th of the major scale the notes blend easily with a myriad of chord progressions.
|
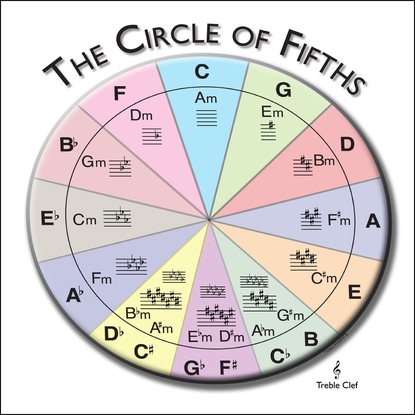
The circle of fifths (left) is a great way to organize and learn your scales. Melodies are created from scales and the harmonies that support them likewise are created from scales. In short, studying the keys is essential for every aspiring player. The chords of each key (right) are organized in the order of the circle of fifths.
|
|
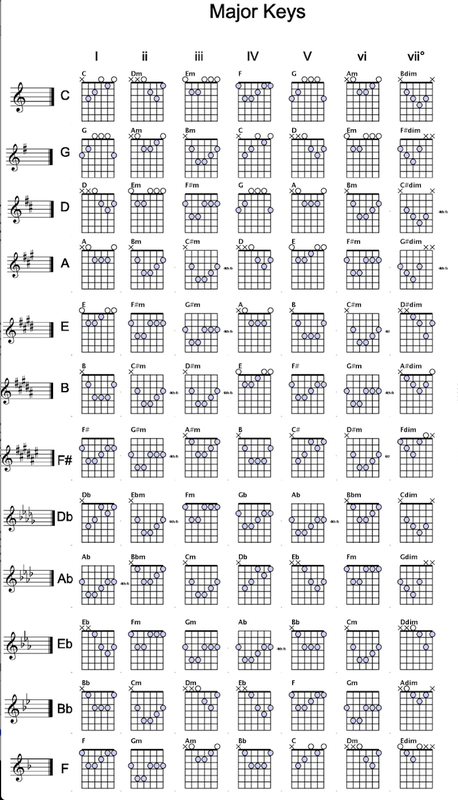
The chord reference below gives you a I IV V in major and a i iv v in minor for each key. It's a great way to prepare for charts. Many chord progressions can be thought of as a variation on I IV V. Like I vi IV V, or I ii IV V.
|
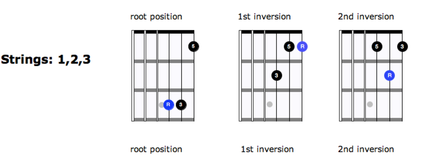
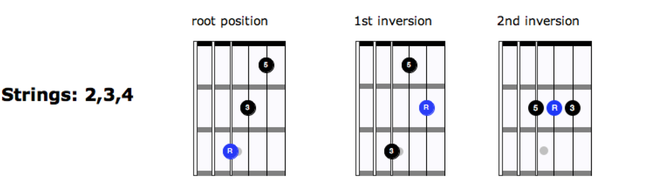
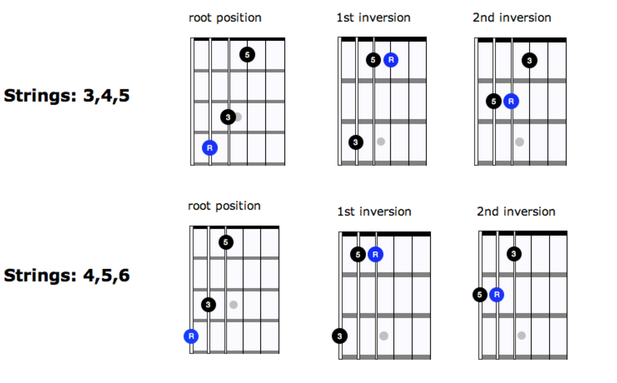
Just as piano players learn inversions of triads, guitar players do too. These 3 shapes correspond to the keyboard example (left) and are "move-able" forms that do not require a "barre". Besides being fairly easy to play, these forms are the basis for many signature guitar riffs and a great way to grow your fret-board harmony knowledge.
|
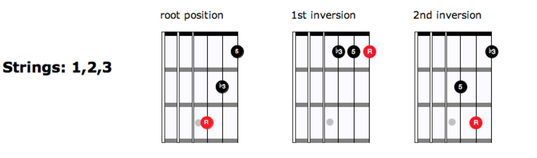
If you lower the third note of each triad above you would get the result to the left. This concept of voices "moving" within a chord is a powerful one. It can increase your chord vocabulary exponentially.
Same concept as above except on the next string set. Do you know why the shapes are different for this set of strings?
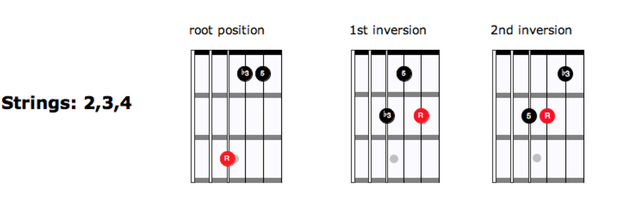
As you learn these common forms be sure to identify the root, third, and fifth of each shape. That will go a long way toward expanding your fret-board harmony. For example instead of moving the third down to make minor you could move it up for sus4 or down a whole step for sus2. Even if it doesn't make sense now, it will later. hang in there!

Practice tip: After you are fluent with the chords above, begin practicing each one using only fingers 2,3,and 4 of the left hand. After 2 weeks it should feel pretty comfortable. The next step? learning to Barre.
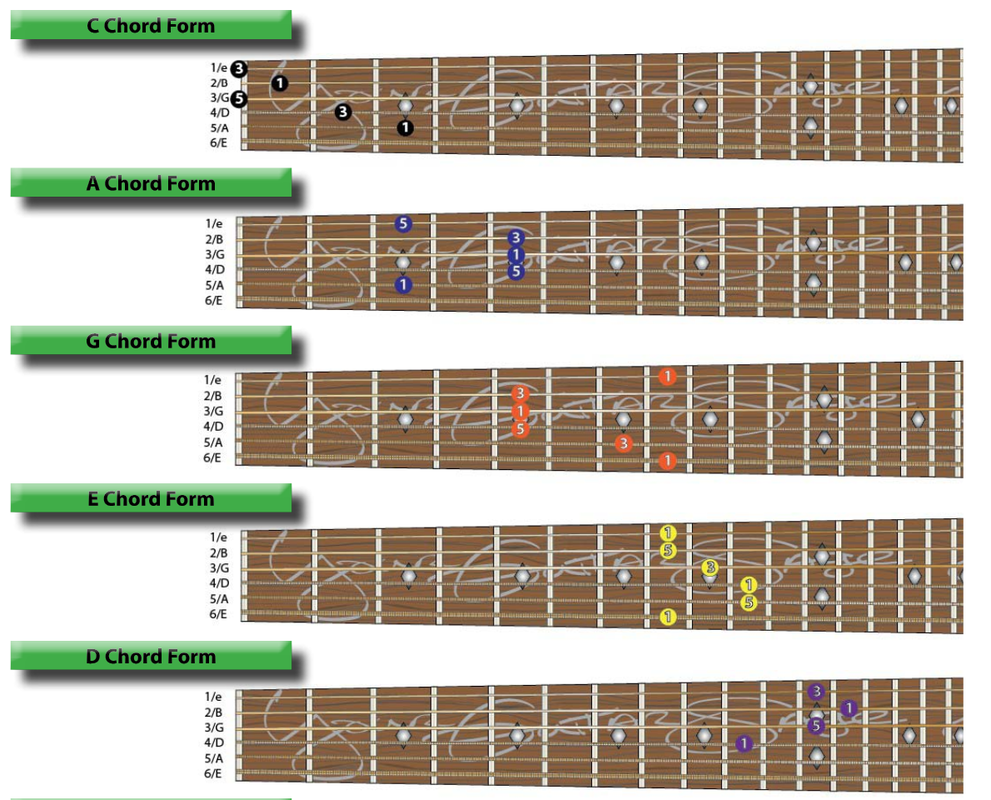
Tying things together... Hint: remember the root position form on string set 123? It can be "seen" in the A shape chord above, the first inversion corresponds to and can be found in the E shape, and the second inversion is within the ____ shape? Did you get the answer? These common chord forms can be used to expand your understanding of the fret-board. Can you see why we use C-A-G-E-D ? If you figure out the notes produced by the fingerings below you will discover they all spell C E G or a C major chord! It is very useful to know several positions for the same chord on guitar especially when sight reading chord charts! It can be a lifesaver. Several of the movable shapes of the CAGED chords require a Barre.
Tying things together... Hint: remember the root position form on string set 123? It can be "seen" in the A shape chord above, the first inversion corresponds to and can be found in the E shape, and the second inversion is within the ____ shape? Did you get the answer? These common chord forms can be used to expand your understanding of the fret-board. Can you see why we use C-A-G-E-D ? If you figure out the notes produced by the fingerings below you will discover they all spell C E G or a C major chord! It is very useful to know several positions for the same chord on guitar especially when sight reading chord charts! It can be a lifesaver. Several of the movable shapes of the CAGED chords require a Barre.
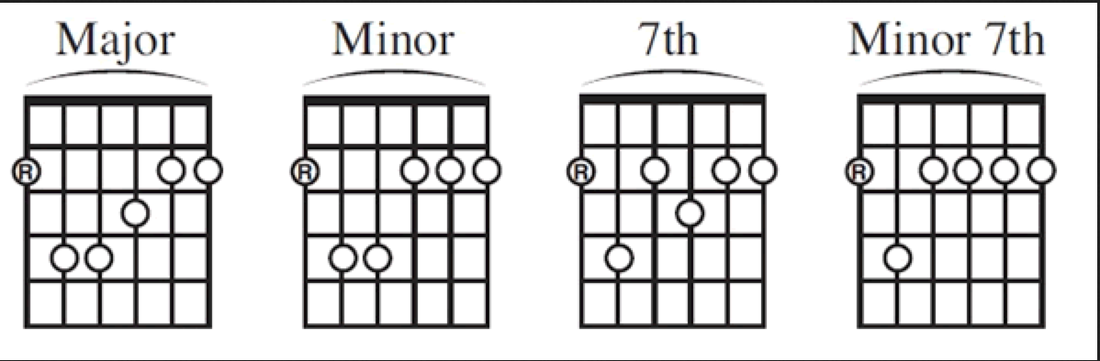
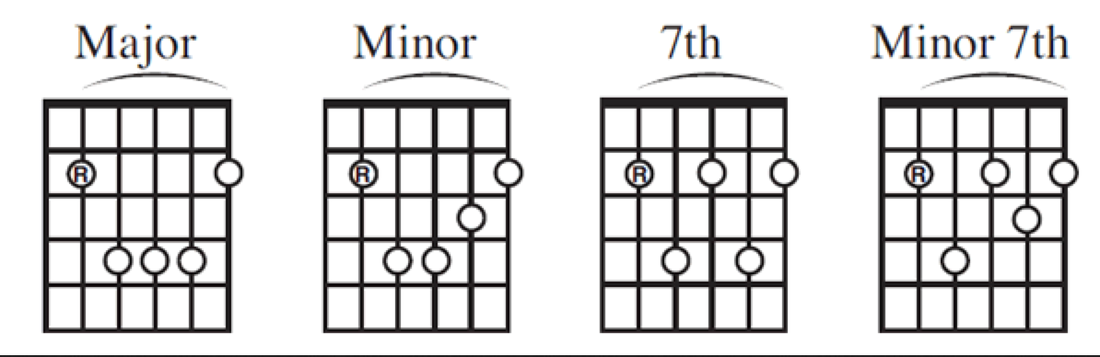
The E shape Barre form we saw in the CAGED chords is shown below. By lifting specific fingers you can change the chord quality from major to minor, dominant seventh, or minor seventh. Helpful tip: The root is determined by the position on the low E string. Where would you play a Bb minor seventh chord?
The same concept using the A shape chord or fifth string root. The same Bb minor seventh? Can you figure out what chord shape and position to play?
These inversions because of the lower range are very useful to know for bass lines, arpeggios, solos, and guitar riffs. Next we will study moveable scale patterns and begin to match them to specific chords and progressions.

A pentatonic scale is similar to a diatonic scale except you omit 2 notes the 4th and 7th of major. So a C major scale would be CDEGA. This proves to be a very useful scale. Its relative minor would be ACDEG. The chart (left) shows finger patterns that spell the pentatonic scale as they connect with the C-A-G-E-D chord system for studying fretboard harmony. Although learning all five of these patterns may seem daunting at first it is worth the effort in the freedom it will give you for playing in any key or position on the guitar. Pentatonic scales are used in rock, country, blues, spirituals, folk songs, pop, and certain formal and world music. They have endless possibilities.